Thursday 14 April 2016

Wong Bok, Abalone & Fish Maw Soup

This is one of my favourite soup. So sumptuous & flavorful, nutritious too with collagen! While typing this, I really feel like slurping up a bowl of this soup for supper. I cooked this during the last Chinese New Year, would definitely cook it again. The soup was so sweet as I added lots of good ingredients. Homemade soup is the best, full of nutrients minus the MSG.

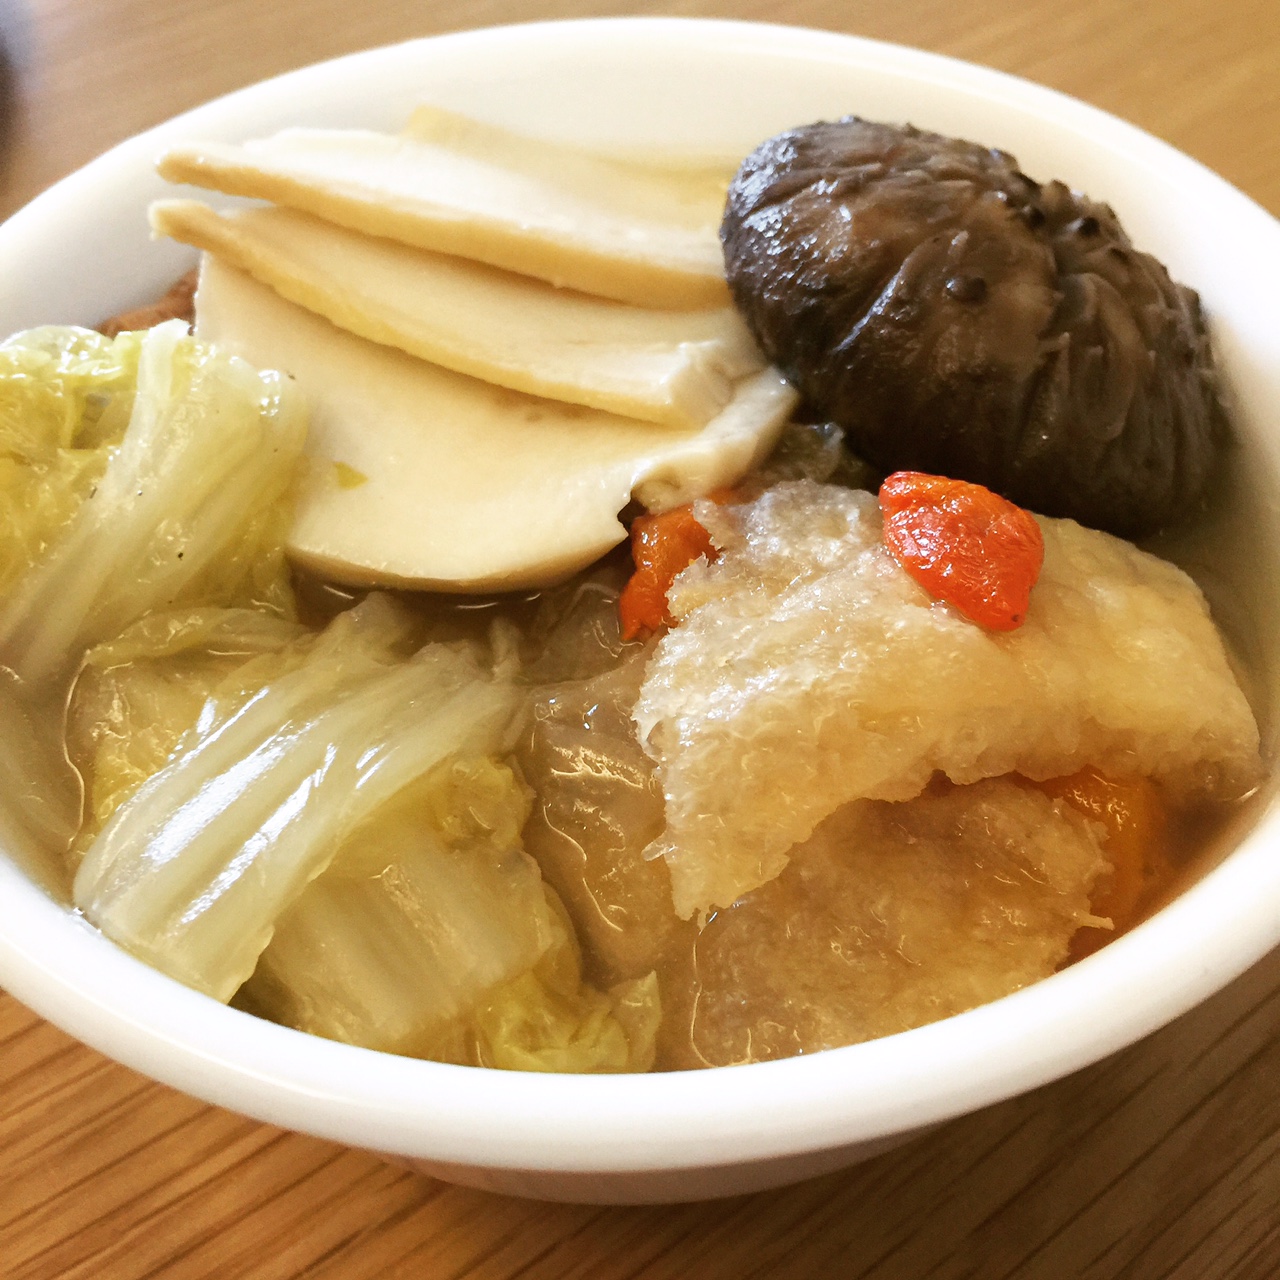
Wong Bok, Abalone, Fish Maw Soup
Ingredients:
- Wong Bok 1 medium size
- *Abalone 1 can (人月牌澳洲鲍鱼)
- *Fish Maw (premium) 2 big pieces
- *Wolfberries a handful
- Red dates (extra large) 10
- Dried mushroom (日本冬菇) 5 to 6
- Dried Scallop (Japanese, medium size) 5 to 6
- Carrot 1 large
- Dried Fig (无花果) 3
- Pork ribs 500g

Method:
1) Pre soaked the dried mushrooms till they are soft to touch
2) Wash, cut the Wong bok, separate the stem and leaves
3) Blanch pork ribs in boiling water. Discard the water.
4) In a new pot of water, add all the ingredients except the * and Wong bok leaves
5) Boil soup for 45 mins and put in thermal pot
(I usually prepare this in the morning and leave it in the thermal pot till evening dinner time. You can also use slow cooker or cook over the stove. This soup is nicer if you braise it longer.)
6) Approx an hour before serving soup, take the inner pot out of the thermal pot and bring to boil over stove.
7) Add Fish maw and Wong bok leaves and bring to boil for about 30 mins or more.
(The fish maw needs to be pre soaked in warm water for about half an hour or more till soft. As I have bought the premium fish maw, it does not have the fishy & oily taste, so I did not blanch it in hot water. When it is soft, wash & cut it into small pieces.)
8) Season with sea salt (if need) & pepper. Add a tsp of Chinese wine if you like it. When soup is ready and boiling, add the abalone slices and wolfberries. Off the fire immediately.
9) Put pot back into thermal pot till ready to serve.

Tips:
Good quality and generous amount of ingredients will make the soup sweet, very sweet.😊
You can use chicken to replace the pork ribs.


Wednesday 13 April 2016

鸡蛋苋菜 (Spinach with Egg)

本来是三蛋(咸蛋,皮蛋,鸡蛋)苋菜, 为了吃得健康些, 我煮了鸡蛋苋菜, 加了鲜银鱼, 新鲜鲍鱼菇和枸杞子. 上汤是我自己煮的. 我爱吃菜, 一大碗热腾腾的青菜, 吃了很暖胃. 小孩们也吃了不少.

鸡蛋苋菜
材料:
- 苋菜 (圆头) 两把
- 新鲜鲍鱼菇 一包
- 鸡蛋 (大) 一粒 (打散)
- 鲜银鱼 一把
- 枸杞 十粒
- 蒜 一/两粒

调味料:
- 海盐 少许 (如果上汤够味,可免)
- 胡椒粉 少许
- 食用油 一大匙

上汤:
我用鸡胸肉, 银鱼, 红萝卜, 大葱(白的) 煮汤, 水不要太多.
你也可以选用上等的Dashi(日本的上汤调味)或无味精的鸡精块, 加水.

作法:
1) 苋菜洗干净, 拔好, 备用.
2) 热锅, 加入油, 爆香蒜.
3) 放入银鱼, 炒香.
4) 加入苋菜, 鲍鱼菇, 大火炒
5) 倒入上汤, 盖上锅盖, 中火把菜焖软 (要留意不要把汤焖干)
6) 加入盐(如需要), 胡椒粉调味
7) 汤滚时, 倒入鸡蛋, 加入枸杞子, 马上熄火

Spinach with Egg
Ingredients:
- Chinese spinach (round head) 2 bunches
- Abalone mushrooms (fresh) 1 packet
- Egg (Large) 1 beaten
- White baits (fresh) a handful
- Wolfberries 10
- Garlic 1 or 2

Seasonings:
- Sea salt a pinch (If stock is flavorful, can omit)
- White pepper a dash
- Cooking oil 1 tbsp

Stock:
I use chicken breast, white baits, carrot, big white onion to prepare stock.
Can also use Japanese Dashi or MSG free chicken cube.

Method:
1) Wash & cut spinach
2) Heat up wok, add oil, fry the garlic
3) Lightly fry the white baits
4) Stir fry the spinach and mushrooms over big fire
5) Add stock, cover the wok, use medium fire to cook the spinach (ensure the soup/stock does not dry up)
6) Add salt (if needed) & pepper
7) When soup is boiling, add beaten egg and wolfberties. Off the fire immediately.

Sunday 10 April 2016

100% Brown Sugar Chiffon

Our breakfast are mostly homemade except on days when mummy is too exhausted . The kids usually have homemade bread for breakfast. When we get a little bored with bread, I will make cakes. Chiffon is a good choice as it is a light cake. And eggs are good for my lil girl who does not consume much protein. The only concern I have is the sugar. I hardly use white sugar at home. When I came across this recipe that uses 100% brown sugar for chiffon, I can't wait to try it. At first, I was worried that a chiffon that uses brown sugar would turn out dense and heavy. But the result is a healthier, soft, and surprisngly light chiffon.
This chiffon uses a Jap method that does not require sugar to be added to the yolks. No baking powder or cream of tartar is needed.

100% Brown Sugar Chiffon
(for a 17cm tube pan)

Ingredients:
- Egg yolks 4 (60g egg)
- Grapeseed oil 50ml
- Milk 60ml (to be warmed to 36-37'c)
- Cake Flour 75g
- Egg whites 4
- Brown Sugar 60 to 65g (or a bit more if you prefer a sweeter cake)

Method:
1) Preheat oven to 180'c
2) Add oil & milk to yolks and mix with a whisk. Just mix well, need not beat.
3) Add sifted flour to yolks and mix well.
4) Beat whites till foamy. Add sugar over 2 times and beat till stiff peak.
5) Add 1/3 of white to yolk mixture and mix with a whisk.
6) Add remaining whites over 2 times to yolk mixture and fold gently with spatula till no streak of white.
7) Pour mixture into tube pan and lightly tap it on the tabletop to remove large air bubbles.
8) Baked at lowest rack at 180'c for 25mins.
9) Invert pan when remove from oven. Unmould when it is completely cold.

(Recipe adapted from a Japanese chiffon book by 青井聡子)

Oven temperature and baking time may vary for different ovens.

Tips:
I use Okinawa brown sugar and love it. 
I baked this chiffon in cuppies. Baking time is approx. 20mins at same 180'c.
I have also baked it in 15cm tube pan and mini chiffon pan. 

These are my mini chiffons for my girl to bring to school. Pic 1 is a mini chiffon with chocolate chips added.


Lemon Chiffon

If you like a cake that is light & lemony, you will love this Lemon Chiffon. This uses a Japanese method that does not require sugar to be added to the yolks unlike normal chiffon methods. No baking powder or cream of tartar is required for this recipe. Simple method but the result is a light, soft & fluffy chiffon.

Lemon Chiffon Recipe
Ingredients:
(for a 17cm chiffon tube pan)
- Egg yolks 4 (60g egg)
- Grapeseed oil  50ml
- Lemon juice + water = 60ml (use about half a lemon)
- Lemon zest from half a lemon

- Cake flour 70g
- Egg whites 4
- Caster sugar 70 to 75g (or a bit more if you prefer a sweeter cake)

Method:
1) Preheat oven to 180'c
2) Add oil, lemon juice & lemon zest to yolks and mix using a whisk (just mix well, need not beat)
3) Add sifted flour and mix well
4) Beat egg whites till foamy. Add sugar over 2 times and beat till stiff peak
5) Add 1/3 of white to yolk and mix with a whisk
6) Add remaining white over 2 times into yolk mixture. Use spatula to fold gently till no streak of white
7) Pour mixture into tube pan and lightly drop the pan on tabletop to remove large air bubbles
8) Bake at lowest rack at 180'c for 25 mins
9) Invert pan after taking it out from the oven. Unmould when it is completely cold

(Recipe adapted from a Japanese chiffon book by 青井聡子)

Baking time and temperature may vary for different ovens.

Tips:
I use 40ml juice + 20ml = 60ml and the zest of a whole small Sunkist lemon.
I use golden caster sugar about 73g.
If you prefer the lemon taste to be milder, try 30ml juice + 30ml water, lesser zest and/or add more sugar.

Saturday 9 April 2016

What I Have Cooked & More...

These are the dishes that I have cooked. Some pictures I have not included. Do stay tune for the recipes...

Ingredients

To get a successful bake, you need a good recipe with good quality ingredients. My friends have been been asking me what ingredients do I buy/use. Sharing my personal preferences below. There are still some good brands I have not tried and would love to do so soon. Don't forget to add in the most important ingredient - Love💖
And Practice makes Perfect!😊

Basic Ingredients:
1) Flour
All Purpose Flour (Plain Flour)
- Bake King, Origins

Cake Flour (Low Protein Flour)
- Japanese Premium Low Protein Flour, Blue Jacket, Bake King Top Flour

Bread Flour (High Protein Flour)
- King Arthur Unbleached Bread Flour, Japanese Premium High Protein Flour, Origins High Protein Flour

Wholemeal Flour
- Origins Wholemeal Flour

2) Sugar
Billington's Organic Golden Caster Sugar (I use this to replace white sugar)
SIS Raw Sugar
SIS Icing Sugar
Okinawa Brown Sugar

3) Butter
President Unsalted Butter
President Salted Butter

4) Oil
Borges Grapeseed Oil

5) Milk
Magnolia Fresh Milk
Milk Powder (any brand)

6) Eggs (60g)
As long as they are fresh.

7) Yoghurt
Plain or Greek Yoghurt (any brand is fine)

8) Sea Salt (any good quality brand is fine)

9) Yeast
SAF-Instant Yeast


Friday 8 April 2016

Bento'ing with Bread

In the past, my girl used to be not able to "swallow" even half a slice of bread. She would claim to have stomachache or want to vomit if I forced her to eat her breakfast. No point giving her cereals, milk or such as she doesn't like any of these. Thank God that gone are those days ever since I started making my own bread. She likes homemade bread. And I usually add in fresh milk and/or yoghurt, cheese (as she does not drink milk) and nutritious ingredients like sesame, chia seeds, flax seeds and even fresh pumpkin or sweet potato puree. She happily eat them up without knowing.
When I first started giving her homemade bread, I made the extra effort to make the bread look pretty and hopefully increase her appetite. Now that she takes to homemade bread well, I only do nice bento during the school holidays.


White & Wholemeal Timer Loaf

Rise & Shine! It's really nice to wake up to the aroma of a freshly baked loaf of bread. The kids get to eat fresh & soft bread before they leave for school. I will put the ingredients into the breadmaker and set the timer before I sleep. The breadmaker will do the rest of the job. No egg or fresh milk is used for this timer recipe. I added some wholemeal flour to enhance the nutrition value, without the kids' knowledge (they do not like wholemeal bread).
On days when there is no school, Mummy & lil girl would use our homemade bread to make Bread Bento. Unknowingly, lil girl can eat almost 3 slices of bread with fillings. Mummy will eat up the extras so there is no wastage.


White & Wholemeal Timer Loaf
Ingredients:
230g Unbleached bread flour
20g Wholemeal flour
155g Water
20g Raw sugar
1 tsp Honey
15g Salted butter
5g Milk powder (optional)
3g Yeast
Method:
Using the timer function, basic/white/soft bread mode, light crust

My DonLim Breadmaker

This post is specially dedicated to my DonLim 姐妹们. You, ladies rock always! Without you all, especially Lynn, I would probably still be thinking, "Should I get a breadmaker?". I am blessed, my 小小无名 DonLim has been serving me well till now. I can't live without a breadmaker.
One day I read about the amount of preservatives used in some "commercial" bread. Since then, I started goggling  for a breadmaker, hoping to get one to make my own bread. And I remembered when my boy was young, he could not eat some "commercial" brands bread, he would react badly to it with vomitting and stomach discomfort. We brought him for a detailed wheat allergy test and the result was negative. It could be due to the ingredients/preservatives used.
I goggled, read up and was so happy to find a DonLim group in Facebook. I bought my first DonLim breadmaker at $69! My first bread (following the recipe from the manual) didn't turn out that soft and nice. But thanks to my DonLim friends who tried, tested and shared their recipes. After few experiments, the bread just got better and better. I have come up with my recipe (I will share in later post) of a loaf bread which I use the timer function to bake it. My kids get to eat freshly baked bread in the morning before they go to school. We hardly buy outside bread these days. Also through this DonLim group, I made many good friends who simply love to bake & cook!
I have been contemplating to get a new breadmaker, either a Panasonic or a pink Zojirushi. I can't make up my mind, till my DonLim decided to say bye bye one day..

Thursday 7 April 2016

How It All Started...

Finally I started my own baking & cooking blog. I believe Homemade with Love is the best! With so many kitchen gadgets to help us these days, life is made much easier. I must said a Big thankful to bloggers, home bakers who so generously shared their recipes and pictures online. They are the ones who got me started. And of course to my awesome friends who encouraged me to bake/cook, sent me recipes and even accompanied me to the markets. I think all bakers need the sense of inspiration & motivation after spending hours in the kitchen. Therefore I am grateful to my family, my friends & my neighbours who gladly eat & love what I baked/cooked. My son, the biggest eater of my homemade food, never failed to say, "Yummy, Delicious, Best Food!....", but he is not fussy lah. To my most picky lil girl, I am the happiest to see her enjoying Mummy's homemade food and eating a decent portion. And to a friend who seems to love all my bakes (non diary for her), she said, "I like it/them just the way it is..."
Lastly, my hb, the healthy one who would buy me the best ingredients & also he bought for me, my dream pastel pink KitchenAid.